DIY Concrete Landscape Curbing: A Comprehensive Guide
Landscape curbing adds a touch of elegance and functionality to any outdoor space. It defines garden beds, creates clean lines along walkways, and helps retain mulch and soil. While professional installation offers convenience, the cost can be a significant deterrent. That’s where do it yourself concrete landscape curbing comes in. This comprehensive guide will walk you through the process, providing you with the knowledge and steps necessary to create beautiful and durable concrete curbing yourself, saving you money and adding a personalized touch to your landscaping.
Why Choose DIY Concrete Landscape Curbing?
Several compelling reasons exist for opting for a do it yourself concrete landscape curbing project. The most obvious is cost savings. Professional installation can easily run into hundreds or even thousands of dollars, depending on the size of your yard and the complexity of the design. By tackling the project yourself, you only pay for materials, which significantly reduces the overall expense.
Beyond cost, do it yourself concrete landscape curbing allows for complete customization. You have full control over the shape, color, and texture of the curbing, ensuring it perfectly complements your existing landscape. You can choose from a wide variety of molds and stamps to create unique designs that reflect your personal style. Furthermore, the satisfaction of creating something beautiful and functional with your own hands is a reward in itself.
Finally, do it yourself concrete landscape curbing can be a great learning experience. It’s an opportunity to develop new skills and gain a deeper understanding of concrete work. This knowledge can be valuable for future home improvement projects.
Planning Your DIY Concrete Landscape Curbing Project
Proper planning is crucial for a successful do it yourself concrete landscape curbing project. Before you even purchase materials, take the time to carefully plan out your design. Start by measuring the areas where you want to install curbing. This will help you determine the amount of concrete mix and other materials you’ll need.
Design Considerations
Consider the overall aesthetic of your landscape when designing your curbing. Do you prefer straight lines and geometric shapes, or do you want a more natural, flowing look? Think about the color and texture of the curbing. Will it blend in with your existing landscaping, or will it stand out as a focal point? Also consider the height and width of the curbing. It should be tall enough to retain mulch and soil, but not so tall that it becomes an eyesore.
Material Selection
Choosing the right materials is essential for creating durable and long-lasting do it yourself concrete landscape curbing. You’ll need concrete mix, water, a curbing mold or form, a trowel, a tamper, and potentially color additives or sealers. Opt for a high-quality concrete mix specifically designed for outdoor use. This will ensure that your curbing can withstand the elements and last for years to come. Consider using a concrete dye to add color to your curbing. You can choose from a wide range of colors to match your landscaping. A concrete sealer will help protect your curbing from moisture and stains.
Tools and Equipment
In addition to materials, you’ll also need the right tools and equipment for your do it yourself concrete landscape curbing project. Essential tools include a wheelbarrow or mixing tub, a shovel, a trowel, a tamper, a level, a measuring tape, and safety glasses. Depending on the scale of your project, you may also want to rent a concrete mixer. A power trowel can help create a smooth and professional finish. Don’t forget safety gear such as gloves and a dust mask.
Step-by-Step Guide to DIY Concrete Landscape Curbing
Now that you’ve planned your project and gathered your materials, it’s time to get started with the actual installation. Here’s a step-by-step guide to do it yourself concrete landscape curbing:
Step 1: Prepare the Site
The first step is to prepare the site where you’ll be installing the curbing. Remove any grass, weeds, or other debris from the area. Level the ground and compact the soil. This will provide a stable base for your curbing. Use a string line or garden hose to mark the desired path of the curbing.
Step 2: Mix the Concrete
Next, mix the concrete according to the manufacturer’s instructions. Add water gradually until you achieve a thick, workable consistency. Be careful not to add too much water, as this can weaken the concrete. If you’re using a concrete mixer, follow the manufacturer’s guidelines for mixing times and ratios. If you’re mixing by hand, be prepared for a good workout.
Step 3: Pour the Concrete
Once the concrete is mixed, carefully pour it into the curbing mold or form. Make sure to fill the mold completely, and use a trowel to smooth out the surface. Tamp the concrete down to remove any air pockets. Work in small sections, moving the mold or form along the marked path as you go. Ensure that each section of do it yourself concrete landscape curbing is properly aligned with the previous one.
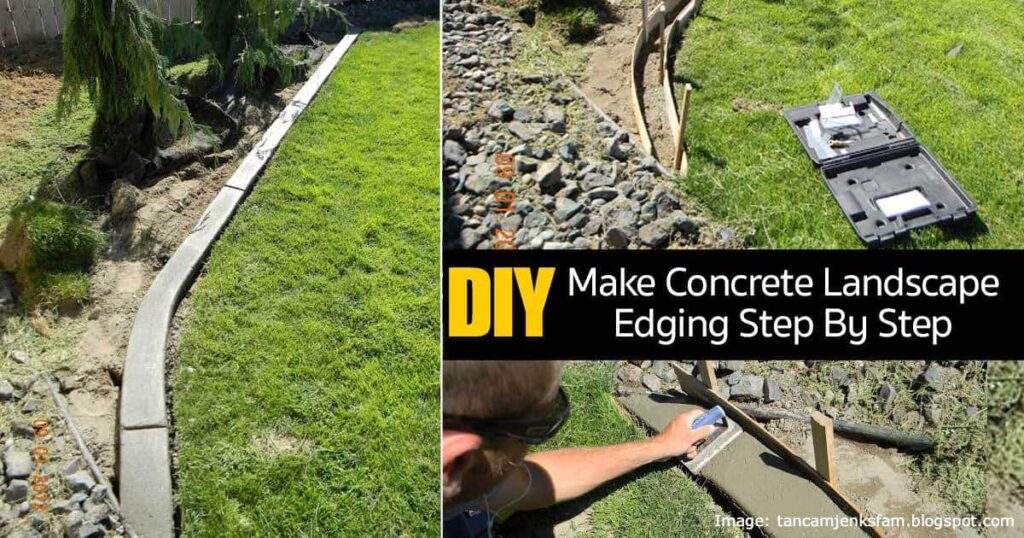
Step 4: Shape and Finish the Curbing
After pouring the concrete, use a trowel to shape and finish the curbing. Create a smooth, rounded edge. You can also add decorative touches, such as stamps or textures. If you’re using a stamp, press it firmly into the wet concrete. Remove the stamp carefully to avoid smudging the design.
Step 5: Cure the Concrete
Curing is an essential step in the do it yourself concrete landscape curbing process. It allows the concrete to harden properly and develop its full strength. Keep the concrete moist for at least 3-7 days. You can do this by covering it with plastic sheeting or spraying it with water regularly. Avoid walking or driving on the curbing during the curing process.
Step 6: Sealing (Optional)
Once the concrete is fully cured, you can apply a concrete sealer. This will help protect the curbing from moisture, stains, and UV damage. Follow the manufacturer’s instructions for applying the sealer. Allow the sealer to dry completely before using the curbing.
Tips for Success with DIY Concrete Landscape Curbing
Here are a few tips to help you achieve success with your do it yourself concrete landscape curbing project:
- Work in small sections. This will make it easier to manage the concrete and ensure a consistent finish.
- Use a level to ensure that the curbing is straight and even.
- Don’t be afraid to experiment with different colors and textures.
- Take your time and pay attention to detail.
- Consider the weather conditions. Avoid pouring concrete in extreme heat or cold.
Troubleshooting Common Problems
Even with careful planning, you may encounter some challenges during your do it yourself concrete landscape curbing project. Here are some common problems and how to troubleshoot them:
- Cracking: Cracking can occur if the concrete dries too quickly. Keep the concrete moist during the curing process.
- Uneven surface: An uneven surface can be caused by improper leveling or tamping. Use a level to ensure that the curbing is even.
- Air pockets: Air pockets can weaken the concrete. Tamp the concrete down thoroughly to remove any air pockets.
- Color variations: Color variations can occur if the concrete is not mixed properly. Follow the manufacturer’s instructions carefully when mixing the concrete.
Conclusion: Mastering DIY Concrete Landscape Curbing
Do it yourself concrete landscape curbing is a rewarding project that can add beauty and value to your home. By following these steps and tips, you can create professional-looking curbing at a fraction of the cost of professional installation. Remember to plan carefully, choose the right materials, and take your time. With a little effort, you can transform your landscape into a stunning outdoor oasis. The key to successful do it yourself concrete landscape curbing lies in preparation, execution, and patience. So, gather your tools, roll up your sleeves, and get ready to enhance your yard with beautiful, custom-made concrete curbing. Consider adding lighting along your new curbing for enhanced nighttime appeal. [See also: Landscape Lighting Ideas] You can further personalize your do it yourself concrete landscape curbing by embedding stones or glass into the wet concrete. Remember to always prioritize safety when working with concrete and power tools. Enjoy the process and the beautiful results of your hard work. The possibilities with do it yourself concrete landscape curbing are endless, limited only by your imagination.
