How to Resurface Concrete Patio: A Comprehensive Guide
Is your concrete patio looking a little worse for wear? Cracks, stains, and general wear and tear can make your outdoor space less inviting. Instead of a costly replacement, consider resurfacing. Learning how to resurface concrete patio is a cost-effective way to breathe new life into your outdoor living area. This comprehensive guide will walk you through the process, from assessing the damage to applying the final seal, ensuring a beautiful and durable finish.
Why Resurface Your Concrete Patio?
Before diving into the how-to, let’s explore the benefits of resurfacing a concrete patio:
- Cost-Effective: Resurfacing is significantly cheaper than replacing the entire patio.
- Aesthetic Appeal: It allows you to update the look of your patio with various colors, textures, and patterns.
- Durability: A properly resurfaced patio can withstand the elements and heavy foot traffic for years to come.
- Increased Home Value: A well-maintained patio enhances your home’s curb appeal and overall value.
- Repairing Damage: Resurfacing can effectively cover up cracks, stains, and other surface imperfections.
Assessing the Damage and Preparing the Surface
The first step in resurfacing a concrete patio is to thoroughly assess the damage. Look for cracks, spalling (flaking or crumbling concrete), stains, and uneven surfaces. This assessment will help you determine the best resurfacing method and materials.
Cleaning the Concrete
Proper cleaning is crucial for a successful resurfacing project. Here’s how to prepare the surface:
- Remove Debris: Sweep away all loose dirt, leaves, and other debris.
- Pressure Wash: Use a pressure washer to remove stubborn dirt, stains, and loose concrete. A pressure washer with a nozzle around 25-40 degrees is ideal.
- Degrease: If there are oil or grease stains, use a concrete degreaser to thoroughly clean the affected areas. Follow the manufacturer’s instructions carefully.
- Etch the Concrete: Etching the concrete creates a porous surface that allows the resurfacing material to bond properly. You can use muriatic acid (always wear protective gear) or a commercial concrete etching solution. Follow the product instructions carefully, and rinse thoroughly with water.
Repairing Cracks and Damage
Before applying the resurfacing material, repair any significant cracks or damage. Use a concrete crack filler or patching compound to fill in cracks and holes. Allow the repair material to dry completely according to the manufacturer’s instructions. For larger areas of spalling, consider using a concrete patch mix.
Choosing the Right Resurfacing Material
Several options are available for resurfacing a concrete patio, each with its own advantages and disadvantages:
- Concrete Overlay: This is a thin layer of modified concrete that is applied over the existing concrete surface. It’s a versatile option that can be used to create various textures and patterns.
- Acrylic Concrete Coating: Acrylic coatings are durable, water-resistant, and available in a wide range of colors. They are a good option for patios that are exposed to the elements.
- Epoxy Coating: Epoxy coatings are extremely durable and resistant to chemicals, making them a good choice for patios that are used for grilling or other activities that may involve spills. However, epoxy coatings can be slippery when wet.
- Stamped Concrete Overlay: This involves applying a concrete overlay and then using stamps to create a decorative pattern, such as brick, stone, or tile.
- Self-Leveling Concrete: This type of concrete is designed to create a smooth, level surface. It’s a good option for patios with uneven surfaces.
Consider the following factors when choosing a resurfacing material:
- Budget: Prices vary depending on the material and the size of your patio.
- Durability: Choose a material that can withstand the elements and heavy foot traffic.
- Aesthetic Appeal: Select a material that complements your home’s style and your personal preferences.
- Ease of Application: Some materials are easier to apply than others. If you’re a DIYer, choose a material that you’re comfortable working with.
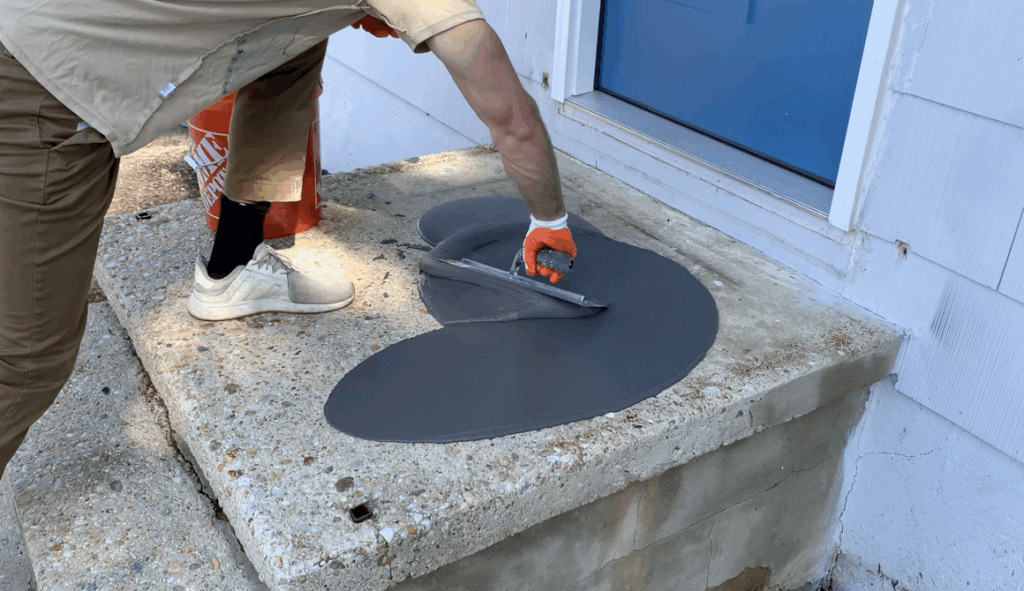
Applying the Resurfacing Material
Once you’ve chosen your resurfacing material, follow these steps to apply it:
- Mix the Material: Mix the resurfacing material according to the manufacturer’s instructions. Be sure to use the correct ratio of water to dry mix.
- Apply the Primer: Apply a concrete primer to the prepared surface. This will help the resurfacing material bond properly.
- Apply the Resurfacing Material: Use a trowel, squeegee, or sprayer to apply the resurfacing material to the patio. Apply the material evenly, and work in small sections.
- Create Texture (Optional): If you want to create a textured finish, use a broom, roller, or stamp to create the desired effect.
- Cure the Concrete: Cover the resurfaced patio with plastic sheeting to prevent it from drying out too quickly. Allow the concrete to cure for the amount of time recommended by the manufacturer.
Sealing and Maintaining Your Resurfaced Patio
Sealing your resurfaced patio is essential for protecting it from the elements and preventing stains. Apply a concrete sealer according to the manufacturer’s instructions. Reapply the sealer every one to two years to maintain its protective properties.
To keep your resurfaced patio looking its best, follow these tips:
- Sweep Regularly: Sweep away dirt, leaves, and other debris regularly.
- Clean Spills Immediately: Clean up spills as soon as they occur to prevent staining.
- Avoid Harsh Chemicals: Avoid using harsh chemicals or abrasive cleaners on your resurfaced patio.
- Use Protective Mats: Use protective mats under furniture to prevent scratches and scuffs.
Troubleshooting Common Issues when you Resurface Concrete Patio
Even with careful planning, you might encounter some issues when you resurface concrete patio. Here are a few common problems and how to address them:
- Cracking: Cracking can occur if the concrete wasn’t properly prepared or if the resurfacing material wasn’t applied correctly. Small cracks can be filled with concrete crack filler. For larger cracks, you may need to re-resurface the affected area.
- Peeling: Peeling can occur if the resurfacing material didn’t bond properly to the existing concrete. This can be caused by inadequate cleaning, improper etching, or using the wrong type of primer. Remove the peeling material and re-prepare the surface before re-applying the resurfacing material.
- Staining: Staining can occur if the patio isn’t properly sealed or if spills aren’t cleaned up promptly. Clean stains with a concrete cleaner. If the stain is stubborn, you may need to re-seal the patio.
- Uneven Surface: An uneven surface can occur if the resurfacing material wasn’t applied evenly. Use a self-leveling concrete compound to correct the unevenness.
DIY vs. Professional Resurfacing
Deciding whether to resurface concrete patio yourself or hire a professional depends on your skills, experience, and the complexity of the project. DIY resurfacing can save you money, but it requires time, effort, and attention to detail. If you’re not comfortable with concrete work, it’s best to hire a professional. A professional contractor will have the necessary tools, equipment, and expertise to ensure a successful project.
Consider these factors when deciding whether to DIY or hire a professional:
- Your Skill Level: Are you comfortable working with concrete and using power tools?
- The Complexity of the Project: Is your patio heavily damaged or does it require intricate designs?
- Your Time Commitment: Do you have the time to dedicate to the project?
- Your Budget: How much are you willing to spend on the project?
Conclusion: Enjoy Your Newly Resurfaced Patio
Learning how to resurface concrete patio is a worthwhile investment in your home. By following these steps and taking the time to do the job right, you can transform your outdoor space into a beautiful and inviting area for relaxing and entertaining. Remember to prioritize proper preparation, choose the right materials, and maintain your resurfaced patio to enjoy it for years to come. Whether you decide to tackle the project yourself or hire a professional, resurfacing is an excellent way to enhance your home’s value and enjoyment.
[See also: Concrete Patio Design Ideas] [See also: Cost of Concrete Patio Installation] [See also: How to Clean a Concrete Patio]
